Introduction
When I first started learning photography, I understood aperture, ISO and shutter speed separately before I properly understood how they all worked together.
That is where the exposure triangle comes in.
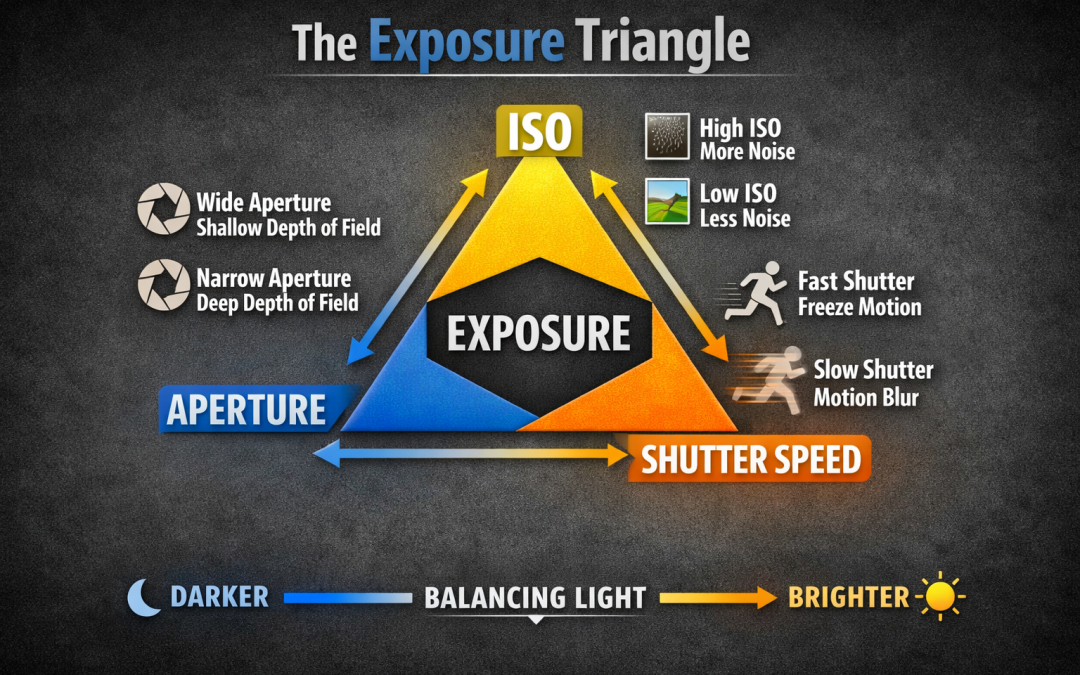
In simple terms, the exposure triangle in photography is the relationship between aperture, ISO and shutter speed. Each setting affects your image differently, but changing one can often mean adjusting another to keep your exposure balanced.
Once I understood this, using manual mode started to make much more sense. Instead of randomly changing camera settings and hoping for the best, I could start making decisions based on the image I actually wanted to create.
What Is the Exposure Triangle in Photography?
The exposure triangle is a simple way of understanding how three main camera settings work together:
- Aperture controls how much light enters through the lens and affects depth of field.
- Shutter speed controls how long the camera sensor is exposed to light and affects how motion is captured.
- ISO affects the brightness of your image and can also affect image quality and noise.
Each setting has its own job. However, they also work together to control the final exposure of your photograph.
If you’d like a more technical explanation of exposure and how cameras capture light, you can also read this guide from Cambridge in Colour.
If you are still getting to grips with aperture, you can read more about aperture in photography.
How Aperture Affects the Exposure Triangle
Aperture controls the size of the opening inside your camera lens.
A wider aperture, such as f/1.8, allows more light into the camera. It can also create a shallow depth of field, which helps separate your subject from the background.
A smaller aperture, such as f/11, allows less light into the camera but keeps more of the scene in focus.
For example, if you change from f/8 to f/2.8, more light enters the camera. As a result, you may need to use a faster shutter speed or lower ISO to keep the exposure balanced.
How Shutter Speed Affects the Exposure Triangle
Shutter speed controls how long your camera sensor is exposed to light.
A fast shutter speed, such as 1/1000 of a second, lets in less light but can freeze fast-moving subjects.
A slower shutter speed, such as 1/30 of a second, lets in more light but can introduce motion blur or camera shake.
This means shutter speed is not only about exposure. It also gives you creative control over how movement appears in your photographs.
You can learn more about this in my guide to shutter speed in photography.
How ISO Affects the Exposure Triangle
ISO affects the brightness of your image without changing your aperture or shutter speed.
A lower ISO, such as ISO 100, usually gives you the cleanest image quality. However, in darker conditions, you may need to increase your ISO to get the exposure you need.
The trade-off is that higher ISO settings can introduce more digital noise or grain into your image.
For example, if you need a fast shutter speed to photograph a moving subject in low light, increasing your ISO can help you maintain that faster shutter speed.
I’ve explained this in more detail in my guide to ISO in photography.
How the Three Camera Settings Work Together
The easiest way to understand the exposure triangle is to remember that changing one setting can affect what you need to do with the others.
For example, imagine you’re photographing a moving subject.
You choose a faster shutter speed to freeze the action. However, because the shutter is open for less time, less light reaches the sensor.
To compensate, you could:
- use a wider aperture to let in more light
- increase your ISO to brighten the image
- or use a combination of both
The important thing is that there isn’t always one perfect combination of settings. Different combinations can create a similar exposure while producing very different-looking photographs.
A Simple Exposure Triangle Example
Imagine you’re taking a portrait outside.
You want a blurred background, so you choose a wide aperture such as f/2.8.
Because the wider aperture allows more light into the camera, you might need to use a faster shutter speed to prevent the image from becoming too bright.
If the light starts to fade, you could then increase your ISO instead of slowing the shutter speed too much.
This is the exposure triangle in practice. You’re balancing the three settings based on the light available and the type of photograph you want to create.
Does the Exposure Triangle Always Give You the Perfect Exposure?
Not necessarily.
The exposure triangle helps you understand the relationship between aperture, shutter speed and ISO, but the correct exposure depends on the scene and what you’re trying to achieve.
Sometimes you may deliberately want a darker image. Other times, you may want a brighter result.
Your camera’s light meter can help, but it doesn’t know your creative intention. That’s why understanding the three settings yourself gives you more control.
Common Beginner Mistakes With the Exposure Triangle
One common mistake is trying to change all three settings at once.
When you’re learning, it’s usually easier to decide which setting matters most for the photograph you’re taking.
For example:
- For portraits, aperture may be your priority because you want control over depth of field.
- For sports or wildlife, shutter speed may come first because you need to freeze movement.
- In low light, ISO may need to increase to help you maintain your chosen aperture and shutter speed.
Another mistake is always trying to keep ISO at 100. While a lower ISO usually gives better image quality, a slightly noisy sharp photo is often better than a clean but blurry one.
A Simple Way to Remember the Exposure Triangle
Think about what matters most for the photograph you’re taking.
If depth of field matters most, choose your aperture first.
If movement matters most, choose your shutter speed first.
Then adjust ISO as needed to help you achieve the exposure you want.
Over time, this process becomes much more natural. Eventually, you stop thinking about the exposure triangle as three separate settings and start seeing them as parts of the same system.
Do You Need to Shoot in Manual Mode?
No.
Understanding the exposure triangle is useful even if you don’t shoot in full manual mode.
Aperture Priority allows you to choose the aperture while the camera selects a suitable shutter speed.
Shutter Priority allows you to choose the shutter speed while the camera handles the aperture.
Auto ISO can also be useful, especially when lighting conditions change quickly.
The important thing is understanding what your camera is doing and why.
Final Thoughts
The exposure triangle in photography can sound complicated at first, but the basic idea is simple.
Aperture controls light and depth of field. Shutter speed controls light and motion. ISO helps control brightness but can affect image quality.
The real skill comes from understanding how these three settings work together.
Once that starts to click, you’ll find it much easier to move away from automatic settings and take more control over your photography.
If you’re still learning the individual settings, I’d recommend reading my guides to aperture in photography, ISO in photography and shutter speed in photography.