Introduction
When I first started learning photography, aperture in photography was one of those settings I kept hearing about but didn’t fully understand.
People talked about it affecting brightness, background blur and exposure, but it didn’t really click at first. Once it did, everything else in photography started to make much more sense.
In simple terms, aperture controls how much light enters your camera through the lens. Because of that, it affects both the brightness of your image and how much of the scene is in focus.
If you’re still getting to grips with the basics, it’s also worth understanding how ISO works, as both settings work together to control your exposure. My ISO Guide
What is Aperture in Photography?
Aperture is the opening inside your camera lens that controls how much light reaches the camera sensor.
A simple way to think about it is like the pupil of your eye. In darker conditions your pupils become larger to let in more light. Your camera lens works in much the same way.
Aperture is measured using f-stops, including:
- f/1.8
- f/2.8
- f/4
- f/5.6
- f/8
- f/11
- f/16
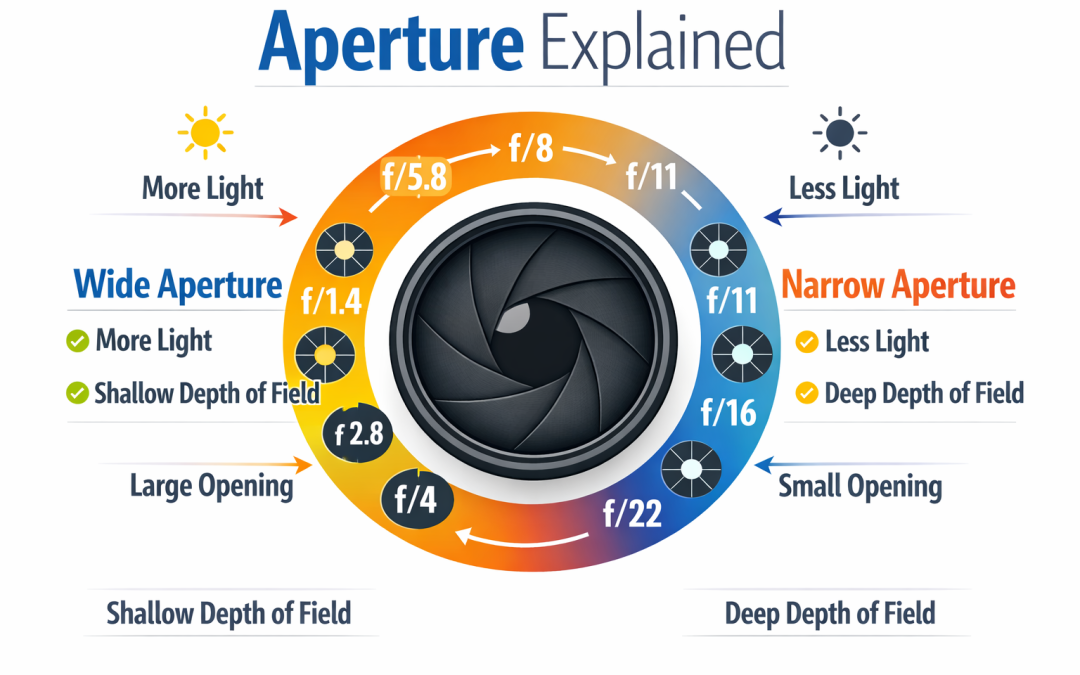
A lower f-number means a wider opening, while a higher f-number means a smaller opening.
If you’d like a more technical explanation of how aperture works, you can read the reference on Wikipedia.
How Aperture in Photography Affects Your Photos
Aperture changes two main things in every photograph:
- How bright or dark the image is.
- How much of the image is in focus.
A wide aperture lets more light into the camera, making your image brighter.
A smaller aperture lets in less light, which can make your image darker unless you adjust your other camera settings.
Depth of Field
Depth of field describes how much of your photograph appears sharp.
Using a wide aperture such as f/1.8 creates a shallow depth of field, making your subject stand out against a blurred background.
Using a smaller aperture such as f/11 keeps much more of the scene in focus, making it ideal for landscapes.
Aperture and the Exposure Triangle
Aperture doesn’t work on its own.
It works alongside ISO and shutter speed to create the correct exposure.
Changing one setting normally means adjusting one of the others to keep your image balanced.
If you’re new to this, I’ve written a complete guide explaining how all three settings work together in the Exposure Triangle.
You may also find my guide to Shutter Speed useful, especially if you’re learning how to balance exposure in manual mode. My Shutter Speed Guide.
Common Beginner Mistakes
One of the biggest mistakes beginners make is always shooting at the widest aperture because they like the blurred background.
While that can look great for portraits, it isn’t always the best choice for every subject.
Another common mistake is forgetting that changing aperture also changes exposure. If your image suddenly becomes darker or brighter, you’ll usually need to adjust either your shutter speed or ISO.
When to Use Different Apertures
As a rough guide:
- Portraits – f/1.8 to f/2.8
- Street photography – f/4 to f/8
- Landscapes – f/8 to f/16
- Low-light photography – use the widest aperture your lens allows
These aren’t strict rules, but they’re a good starting point while you’re learning.
Final Thoughts
Aperture is one of the most important camera settings you’ll learn.
Once you understand how it affects light and depth of field, you’ll find it much easier to take control of your camera and move away from automatic mode.
If you’re working through my beginner photography guides, the next articles to read are my guides on ISO and Shutter Speed, before bringing everything together in the Exposure Triangle. If you’re also wondering which file format to shoot in, have a look at my guide to RAW vs JPEG.